Saturday, September 29, 2012

Organizing....

Are you like me and have so much craft supplies and not sure what to do with it all!?!? Close to my Heart is here to help!! Check out these new organizers....
I have 3 so far and I love them!!


Friday, September 21, 2012

Artiste Blog Hop


Welcome to our September ARTISTE Blog Hop!  Each month we are showcasing the amazing, exclusive ARTISTE Cricut cartridge which can be only purchased through a Close to My Heart Independent Consultant.
We don't want to scare you but Halloween is a little over a month away and we know you have to be thinking about what YOU are going to create for this spooky holiday! We decided to show you all the creative projects you can make using our exclusive Artiste Cricut cartridge. You will be hopping along our haunted trail of creativity - you never know what you will see next!
 If you just happened to come to this blog, you should start at the beginning at Lucy's blog - http://www.love2createitall.com.
Also, to help you get ready to start making your own Halloween projects Lucy has some blog candy for you! She is giving away a Moonlight Complements Dimensional Elements pack!  That's two (2) sheets of Printed Dimensional Elements that you can use to create your own Halloween project! There is a picture of the blog candy on her blog. All you have to do to be eligible to win is to leave a comment on everyone's blog AND become a follower of Lucy's blog.  (If you are already a follower, just let her know in your comment.)
 My project is ... A cupcake box (page 39) made with Spellbound Workshop on the Go kit paper (G1040)

I used our new Black Tulle Ribbon (Z1798), Haunted Assortment (Z1741) and Black & Gray Assortment Sparkles (Z1754)... for the bow on the front.

For the web on top, I used page 76 on the Artiste Cartridge (Z1790)

The stamp set used is the Moonlight Workshop on the Go kit stamp (G1051)

The next stop on the haunted trail is http://mariawoodworth.blogspot.com .
 Here's the entire blog hop lineup in case you get spooked along the way:
1. Lucy - Love 2 Create  http://www.love2createitall.com 
2. Darla - Caution Crafting is Contagious http://www.stampingunderdoctorsorders.blogspot.com
3. Diana - Dianas Free Moments http://dianasfreemoments.blogspot.com
4. Carolyn - Nuts 4 Scrappin' http://www.nuts4scrappin.blogspot.com  
5. Julia Hammond - You Can Create http://youcancreatectmh.blogspot.com
6.Wendy Kessler - My Scrapbooking Blog http://MyScrapbookingBlog.com
7. Pam Stewart - I Candy Scraps http://i-candy-scraps.blogspot.com
8. Carolyn Mendoza - Crafting With Carolyn http://www.craftingwithcarolyn.blogspot.com
9. Jennifer Kramer - 4 Hearts Scrapbooking http://4heartsscrapbooking.blogspot.com
10. Maria Woodworth - Maria's Paper Craft Place http://mariawoodworth.blogspot.com
11. Kindred Hearts - It Makes TOTAL Cents http://itmakestotalcents.blogspot.com
12. Ginger Morriello - Ginger's Creative Cottage http://www.createwithginger.com
 Thanks for stopping by for some Halloween fun -- hope we didn't scare the creativity out of you! Muah-ha-ha!

Tuesday, September 18, 2012

Cricut Artiste Purse

 Purse:
Using Cricut Artiste (Z1790) page 41
Cut:  
3D – 5” – (Slate CS X5930)
3D – Shift – 5” – (Cream B&T from Avonlea X7155B)
1. Stamp in Slate ink (Z2173) – Corner from “Scroll Album Workshop” (G1042) on Slate CS.

2. Stamp in Slate ink – A gift for you from “Christmas Joy” (C1520)
3. Scour all dash lines and fold

4. Glue purse together

5. Glue on outside pocket

6. Add embellishments
 I used Haunted Assortment (Z1741), Black & Gray Assortment Sparkles (Z1754) and Hook & Loop Dots (Z1805)


Friday, September 14, 2012

Fall is in the air... and new SOTM!

Love this new Sept. Stamp of the Month: Fall Favorites (S1209)


Paired with the Decor Journaling Spots (Z1461) makes the prefect gift tag!

Available only in Sept. Get this stamp for just $17.95 or if you are in need of other supplies, spend just $50 and get this stamp set for $5. 


Tuesday, September 11, 2012

A little different

I love Close to my Heart's new Scroll Album (G1042)...
 but the colors were not right for the room I wanted to put it in. 


 So I decided to use the stickers, buttons and stamp set that came with it to make this double page layout and 4 fun cards. 

Think outside the box when you only need part of a kit.


Friday, September 7, 2012

Sept. Stamp of the Month Blog Hop


Welcome to our September Stamp of the Month Blog Hop!  This month Close to My Heart is offering a stamp set called "Fall Favorites".  This set can be purchased exclusively through a Close to My Heart Independent Consultant for only $5 with a qualifying purchase of $50.


In this hop, you will see projects featuring this fun stamp set from many talented crafty ladies!  We hope you enjoy our blog hop today!

If you have just hopped onto my blog, please start at the beginning at Lucy's blog:  http://love2createitall.com.  If you came from Maria Woodworth of  http://mariawoodworth.blogspot.com then you are in the right place!


Layout inspired by page 50 in the Autumn/Winter Idea book. I love the perfect colors in the Flirty Paper Pack (X7160B

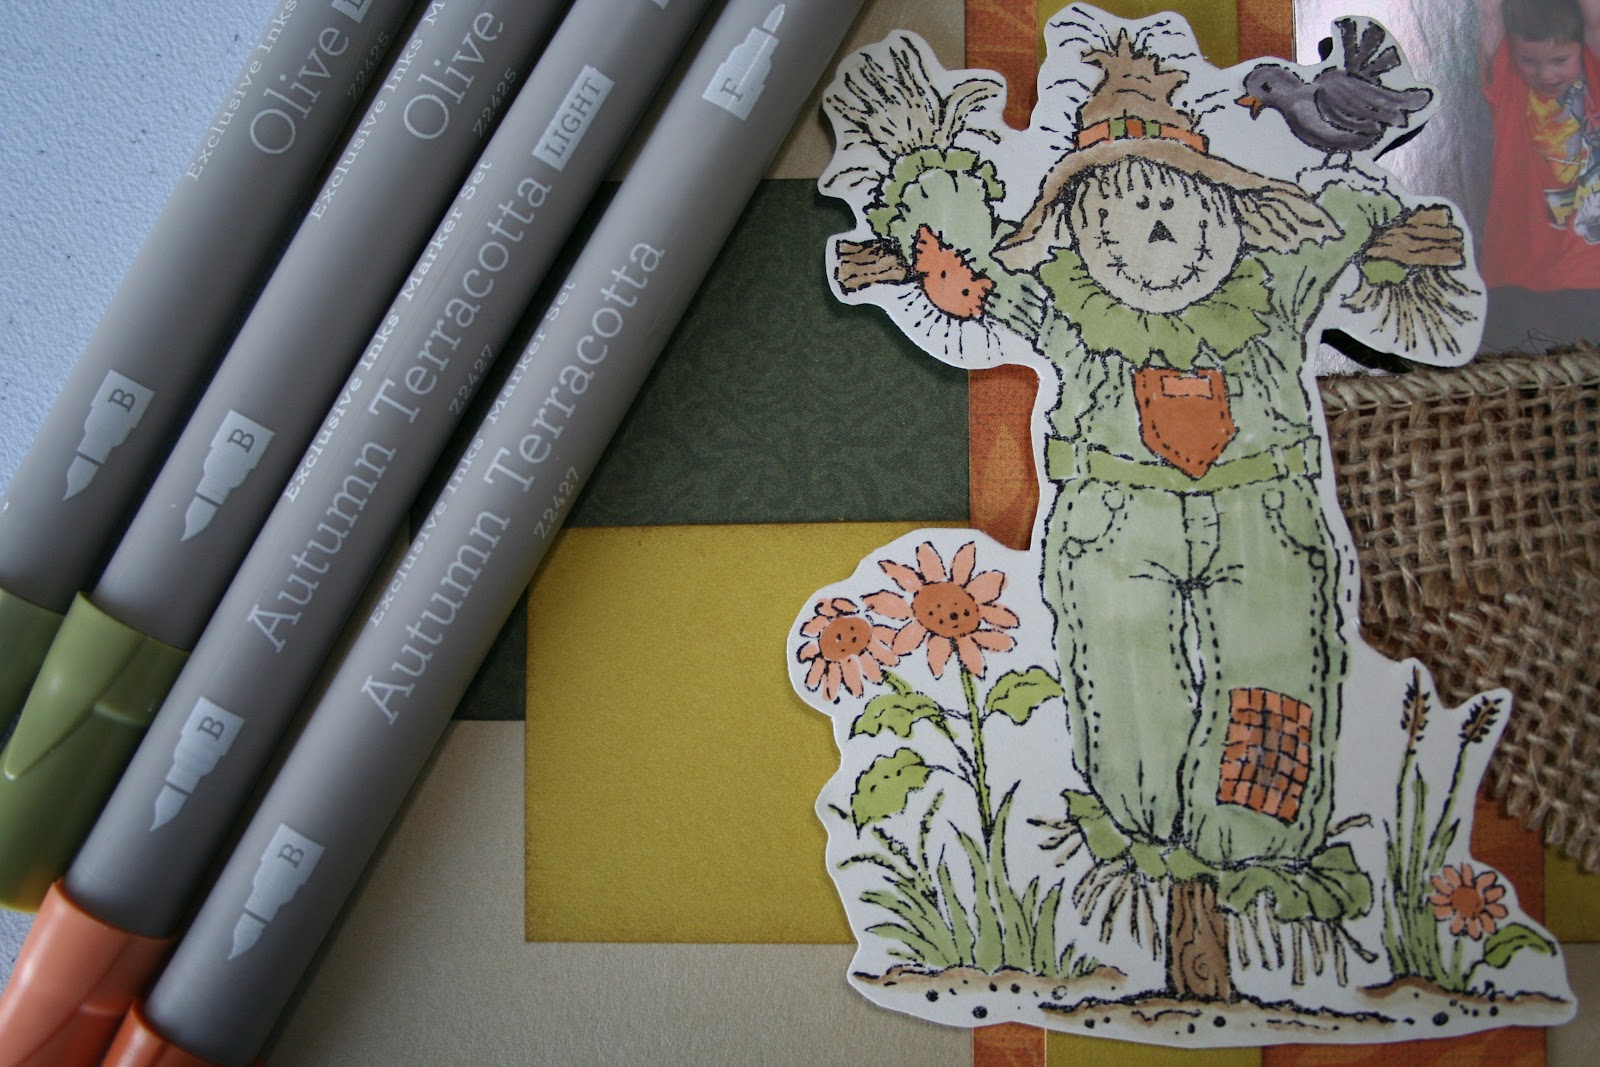
I used our new alcohol-based Olive (Z2425) and Autumn Terracotta (Z2427) markers to color in the Scare Crow

With our new Burlap Ribbon (Z1760), Just Blooms Floret paper Shapes (Z1764) and Opaques Mocha Gems (Z1333) it was easy to add a girly touch.

I just love that Close to my Heart's Acrylix stamps are bendable! This helped me curve the "pumpkin patch" words for my circle.


Your next stop on the Fall Favorites Stamp Set Blog Hop is Carolyn of  http://nuts4scrappin.blogspot.com    

Here is a complete list of the blog hop in case you get lost along the way:


Tuesday, September 4, 2012

How did I do that?

In July, when I taught at convention I had a few ladies ask how I made my spinning Ferris Wheel. 
Here you go:
Using the new Cricut Artiste Collection cartridge (Z1790) I cut the Ferris Wheel on page as large as I could. Note~ if the images in the book are in color... size coordinates. So 10.5 on the wheel will make the legs and box cars the right size. 
Then I took cardboard and traced and cut out the wheel and legs. Sandwiched the cardboard between two cut outs and glued them together. 
I cut the legs so that I could glue them to a TP roll for the center. A lot of liquid glass (Z679) was used! 
I then, with the help of my husband, found a candy holder light up fan and took it apart... used what we needed and glued it to one side of the wheel. This is how we got it to spin. 


I was assigned the Clementine paper pack (X7156B) so that is the paper I used for this project. I used our new color Saddle and the new Complements Canvas Shapes (X7156C) to hide the spinner on the outside of the wheel. The new Almond (Z1769) and Pink (Z1770) Glitz Glitter Gel were also used to hide the cardboard in between the cardstock.